February 19 2022
Containerizing our Web Development Toolchain with Docker
Containerization has been around for decades since chroot, but the technology has become ubiquitous as large tech companies have invested in platforms and tools to make containers easier to use and scale with tools like Kubernetes. While I’d been using containers with Heroku for years, I didn’t realize how pervasive they were until I read an ACMQueue article in 2016 about Google’s Borg, Omega, and Kubernetes, especially this section:
“The isolation and dependency minimization provided by containers have proved quite effective at Google, and the container has become the sole runnable entity supported by the Google infrastructure.”
Containers are how Google can scale services, by abstracting away the physical infrastructure and building orchestration tools to manage them, and they fit into a broader context with the rise of DevOps, handing Engineering an excellent building block for creating software delivery pipelines and deploying applications.
Containers are one level of abstraction up from virtual machines. Virtual machines (VMs) allow you to run an operating system in an isolated environment in a server, virtualizing the hardware, but containers allow you to run a single application within an isolated environment, virtualizing the operating system. Compared to virtual machines, containers are smaller, start faster, and consume fewer resources, so you can run more on a single physical hardware system while maintaining isolation between them.
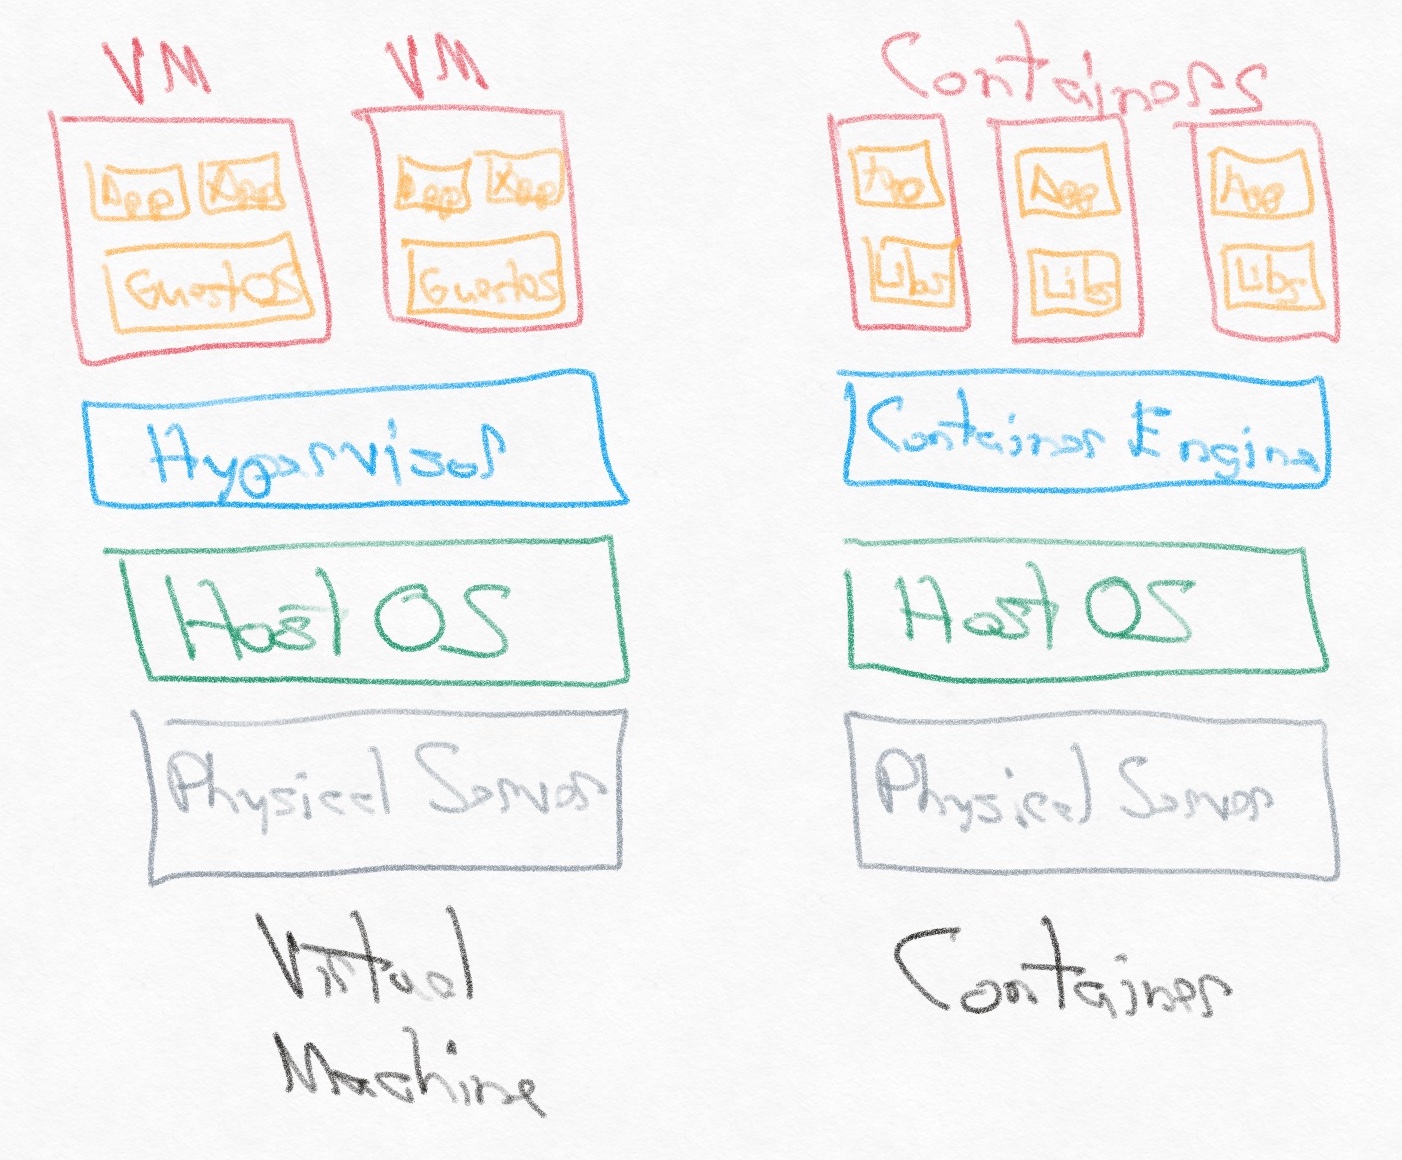
You’ll find many diagrams like this one online, but it’s an oversimplification. Containers are so small and fast because they rely on the host OS’s kernel, but they actually need their own minimal guest OS as well to handle tasks like package management, configuration, and other miscellaneous OS features. The application’s libraries and dependencies as well as the small guest OS are all wrapped up in “Libs”. As an example, the Alpine Linux OS is 5MB, and applications running on it start in less than a second.
Docker made containers accessible and has become very popular since its launch in 2013 with support for Windows, Mac, and Linux. Docker containers are instances of a Docker image, and each image is a stack of immutable layers, based on the commands of your Dockerfile. This layered immutability has multiple benefits, allowing you to only change the image based on new or changed commands and to store layers separately in Docker Hub, the hosted service for distributing public Docker images. Clients can download layers concurrently for performance.
Toolchain Upgrade
Before the transition to Docker, our web app toolchain was a local macOS environment for development, GitHub for source control, and Heroku for deployment. Retrospect Engineering has used Heroku for web app deployment since 2011, starting with Retrospect.com, our Ruby-on-Rails website, and then with Retrospect Management Console, our hosted service for backup analytics. Heroku, now owned by Salesforce, has been a fantastic deployment target. Deploying a new version is as simple as pushing to a Git repository.
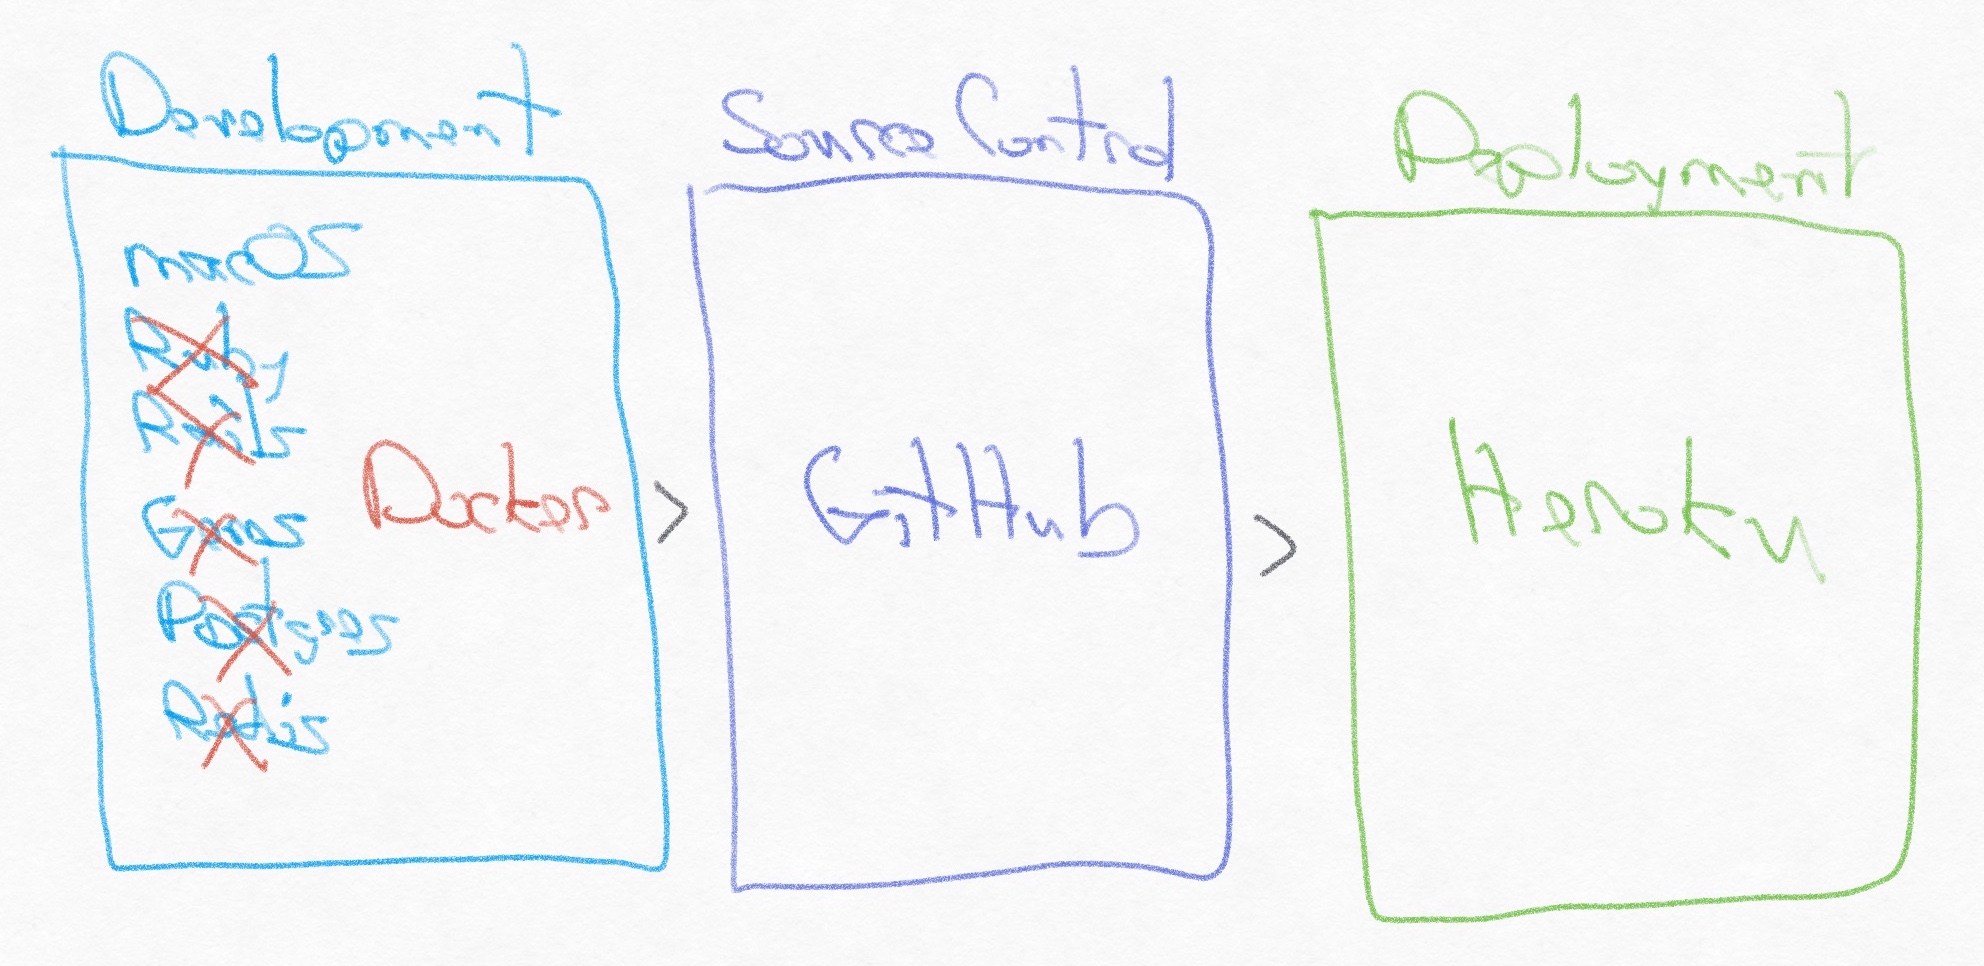
Instead of installing and managing upgrades for Ruby/Rails/Gems/Postgres/Redis on macOS, we manage them all within a Docker container running on our Mac development computers. We finally decided to migrate from a local macOS environment to Docker because of upgrade issues. Every Ruby/Rails/gem/macOS version update hit installation issues which we only resolved after finding a blog post for our specific combination of versions. Upgrades were painful enough that we postponed them, a sure sign that we needed a deeper toolchain upgrade.
Docker provided that next-generation environment, where upgrading a Ruby version was as simple as changing the base Docker image that we depend on. Every upgrade starts with a clean slate in the image, so there are far fewer conflicts between different versions or different packages. Using containers for development work increased the Engineering team’s efficiency.
One Container
The website is a Ruby-on-Rails environment with only a SQLite dependency for local development, so we use a simple Docker configuration file (Dockerfile). Here is our short file for the website:
FROM ruby:2.7.5-alpine3.14 as retrospectdotcom

# Set up environment: build-base for "developer tools", sqlite for SQLite, postgres for Postgres, git for Git, and tzdata for weird Rails 5 error.
RUN apk update && apk add --no-cache build-base sqlite-dev postgresql-client postgresql-dev tzdata git

# Add Gemfiles for Bundler.
RUN mkdir /retrospectdotcom
COPY ./Gemfile /retrospectdotcom
COPY ./Gemfile.lock /retrospectdotcom
WORKDIR /retrospectdotcom

# Set up gems
RUN bundle install
RUN rm -rf /retrospectdotcom

# Run rails server
CMD ["bundle", "exec", "rails", "server", "-b", "0.0.0.0"]
Let’s walk through each chunk:
- Base Image: We use the official Ruby Alpine Linux image as the base image. Common tools like Ruby publish official images to Docker Hub.
- APK: Alpine Package Keeper (APK) is an extremely lightweight package manager. One of the reasons we need a base image inside the container is for the package management functionality, so that we can download the necessary libraries for our application’s environment.
- Gemfiles: We create the directory for our application, copy in the Gemfiles, run
bundle installto install the required libraries, and finally remove both Gemfiles. This image is specifically for local development, so we want to bind mount to the host’s application folder and not depend on any application code within the container. - Gemfile.lock: We actually created a separate
Dockerfilefor runningbundle updatebecause it’s such an infrequent task to generate a newGemfile.lock, and we wanted it to be an intentional action. - Rails Server: We run the
rails servercommand to start the application.
From Terminal, we use the Dockerfile to build the image. Then, to run an instance of the image, we use a bind mount, reference a Docker environment file, and include -it to allow interactive debugging with the pry-byebug gem.
docker build -t retrospectdotcom .
docker run -it --mount type=bind,source="$(pwd)",target=/retrospectdotcom --env-file Docker.env -p 3000:3000 retrospectdotcom
With that, we have the website running in a Docker container with the following features:
- Local Development: It’s accessible at
http://localhost:3000. - Live Editing: The bind mount means the container’s app folder references the app folder on the host under source control, so that we can do live editing and commit our changes as if the app was not running in a container.
- Live Debugging: The
-itparameter enablesttymode for live interaction, which means we can usedebuggerfor breakpointing.
You can also override the default command by passing a command at the end. For instance, to run rails console, use:
docker run -it --mount type=bind,source="$(pwd)",target=/retrospectdotcom --env-file Docker.env -p 3000:3000 retrospectdotcom bundle exec rails consoleInstead of typing the whole line every time, we set up a shell alias in ~/.bash_profile:
alias rs='docker run -it --mount type=bind,source="$(pwd)",target=/retrospectdotcom --env-file Docker.env -p 3000:3000 retrospectdotcom'
# The above command becomes
rs bundle exec rails console
Multiple Containers
Retrospect Management Console is a Ruby-on-Rails web application that has two dependencies: Postgres and Redis. We needed all three services running and able to communicate with each other. This configuration required Docker Compose to handle the multiple microservices.
With Docker Compose, we can set up a docker-compose.yml file to describe the containers, dependencies, volumes, and configurations. Docker Compose even supports health checks to periodically verify that a service is operating correctly.
version: '2'
services:
  postgresdb:
    image: 'postgres:11.2-alpine'
    user: postgres
    ports:
        - "5432:5432"
    volumes:
      - pgdata:/var/lib/postgresql/data
    healthcheck:
      test: ["CMD-SHELL", "pg_isready -U postgres"]
      interval: 5s
      timeout: 5s
      retries: 5
    env_file:
      - 'Docker.env'
  redis:
    image: 'redis:4.0-alpine'
    volumes:
      - redisdata:/data
    ports:
        - "6379:6379"
  console:
    depends_on:
      'postgresdb':
        condition: service_healthy
      'redis':
        condition: service_started
    command: sh -c "rm -f tmp/pids/server.pid && bundle exec rails s -p 3000 -b '0.0.0.0'"
    build: .
    stdin_open: true
    tty: true
    ports:
      - '3000:3000'
    volumes:
      - .:/consoledotcom
    env_file:
      - 'Docker.env'
    entrypoint: "/docker-entry.sh"
  sidekiq:
    build: .
    command: bundle exec sidekiq -C config/sidekiq.yml
    volumes:
      - .:/consoledotcom
    links:
      - postgresdb
      - redis
    env_file:
      - 'Docker.env'
volumes:
  pgdata:
  redisdata:
For our docker-entry.sh file, we added logic to either run any pending Rails migrations if there is a database or re-create the database if it did not exist:
# Run postgres tasks.
if psql -h "$PGHOST" -U "$PGUSER" "$PGDBNAME" -c '' 2>&1; then
    # Apply any migrations.
    echo "Running 'bundle exec rake db:migrate'"
    bundle exec rake db:migrate
else
    # If no database, run db:setup (db:create + db:schema:load + db:seed)
    # Note this will attempt all of those actions above twice (development + test)
    # and might include log errors due to https://github.com/rails/rails/issues/27299
    echo "Running 'bundle exec rake db:setup'"
    bundle exec rake db:setup
fi

# To load database dump, run the following from the *host* Terminal (because Docker can't see the host file system):
# pg_restore --verbose --clean --no-acl --no-owner -h localhost -U postgres -d dbname latest.dump

# Run "command" supplied by docker-compose.
exec bundle exec "$@"
As with the website, we configured Docker to use the host system’s web application folder under source control via a bind mount.
To launch the containers, first build the images then bring the setup up.
docker-compose -f docker-compose.yml build
docker-compose -f docker-compose.yml up
Live debugging is one extra step. We needed stdin_open: true and tty: true entries under the console container in docker-compose.yml. Then, we needed to add debugger in the Rails app where we wanted to breakpoint. Finally, we needed to attach to the container after it launched.
docker ps
docker attach container_name
To detach, type the escape sequence Ctrl+P then Ctrl+Q.
Since the Postgres database is now run in a container, we needed to modify our psql to access it. Fortunately, Docker makes it easy:
# https://stackoverflow.com/questions/27673563/how-to-get-into-psql-of-a-running-postgres-container
psql --host localhost --port 5432 --username postgres
Finally, here are a couple more handy Docker commands:
# Clean up Docker
docker system prune
# Check storage usage (because Docker only is allocated a certain amount of space per its preferences):
docker system df
# Run sh in an instance
docker exec -it container_name sh
Headless Automation Testing
Automation testing is significantly more complicated with Docker. You can’t just drive a browser because there is no screen. We needed to update our Rails Rspec and Capybara setup to use a headless environment for the integration tests. After testing different options, we settled on Selenium Grid with a Google Chrome container using Docker Compose, based on Plymouth Software’s excellent blog post.
With this environment, RSpec can run through our 711 tests for the website and generate screenshots on the failures, covering the site and the embedded partner and support portal.
Here is the docker-compose.test.yml file for reference:
services:
  web:
    environment:
      HUB_URL: http://chrome:4444/wd/hub # <-- Add the HUB_URL environment variable
    depends_on:
      - chrome # <-- Link to the chrome container
    ports:
      - "3000:3000"
    build: .
    command: sh -c "rm -f tmp/pids/server.pid && bundle exec rspec"
    stdin_open: true
    tty: true
    env_file: Docker.env
    volumes:
      - type: bind
        source: .
        target: /retrospectdotcom
  chrome:
    image: selenium/standalone-chrome:4.1.0-20211123 # this version should match that of the selenium-webdriver gem (see Gemfile)
    ports:
      - "4444:4444"
      - "7900:7900"
    volumes:
      - /dev/shm:/dev/shm
Here is a snippet from rails_helper.rb that works for us:
require 'byebug'

# Support devise
require 'devise'
RSpec.configure do |config|
  config.include Devise::Test::ControllerHelpers, :type => :controller
  config.include FactoryBot::Syntax::Methods
end

# Add Capybara settings and remote web driver. See docker-compose.test.yml for more details.
# NOTE: screenshots for failing tests appear in #{Rails.root}/tmp/screenshots.
Capybara.server = :webrick
Capybara.register_driver :chrome_headless do |app|
  chrome_capabilities = ::Selenium::WebDriver::Remote::Capabilities.chrome('goog:chromeOptions' => { 'args': %w[no-sandbox headless disable-gpu window-size=1400,1400] })

  if ENV['HUB_URL']
    Capybara::Selenium::Driver.new(app,
                                   browser: :remote,
                                   url: ENV['HUB_URL'],
                                   desired_capabilities: chrome_capabilities)
  else
    Capybara::Selenium::Driver.new(app,
                                   browser: :chrome,
                                   desired_capabilities: chrome_capabilities)
  end
end

RSpec.configure do |config|
  config.before(:each, type: :system) do
    driven_by :chrome_headless

    Capybara.app_host = "http://#{IPSocket.getaddress(Socket.gethostname)}:3000"
    Capybara.server_host = IPSocket.getaddress(Socket.gethostname)
    Capybara.server_port = 3000
  end
end
Getting the setup exactly right was tricky, but this is the code that works for us. We frequently referred to the Rspec site as well.
Dev Setup
The proof that the toolchain upgrade was a success came when we rolled out Docker to the wider web development team. Previously, setting up Ruby, Rails, and all of the gems was a multi-hour process with frequent web searches to fix environment issues. With Docker, the developers downloaded Docker, built the image with one Terminal command, and launched the multi-container application with a second command. It took five minutes.